Aka. When going too far, means supporting groups.
A moment to give Dr. Jekyll a voice…
To distribute Wifi, to wired devices, or to re-broadcast it to other Wi-fi devices with weak Wi-fi capabilities, all you really need, is a modern wifi repeater. It is only $60. I use it myself. It never crashes. I only have to configure it once. You can attach wired devices to it b/c it has a wired ethernet port you can connect directly to a wired ethernet device, or to a ethernet switch for multiple devices to connect to Wifi via the switch, to the Wifi repeater. And obviously, your wifi devices can connect to wifi repeater. You just need to put the Wifi repeater, somewhere convenient where it can both receive signal from the original AP/wifi router. And send to your wifi devices. Below is a model I am familiar with. It might be called a Wifi Range Extender.
Wifi repeaters have to be Wifi bridges.
This is b/c to the original AP or Wifi Router which it belongs, everything connected a Wifi bridge, looks like one device. This is necessary for any AP that does WPA or any authentication and L2 encryption. The authentication to connect to the first AP, is always attached to the MAC of the Wifi bridge (not to the MAC address of any of the other devices connected to the Wifi bridge, even if it has a MAC address compatible with Wifi frames). Any device that connects to the Wifi bridge, appears to the original AP, as the wifi bridge’s MAC address, even though it can have different IP addresses. It would just appear as a device with multiple IP addresses. This is true of all Wifi repeaters as well.

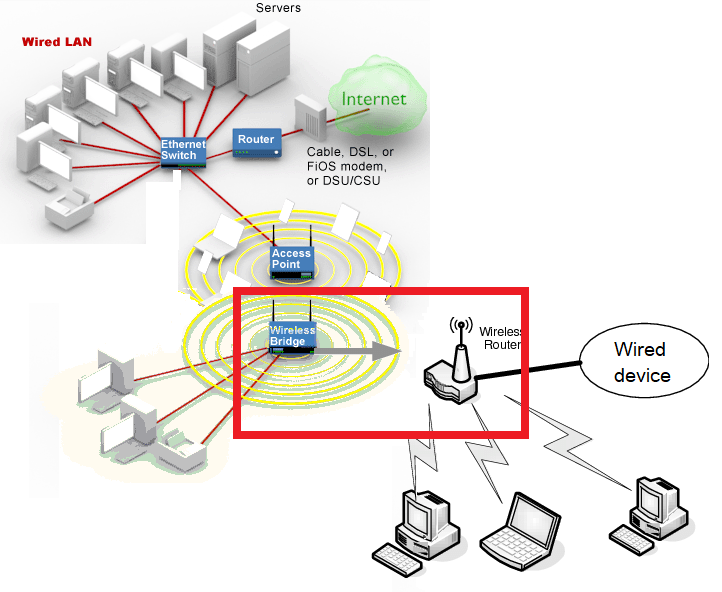
If you want to read more about Wifi repeaters, see link below the diagram of wireless repeater in much larger network.

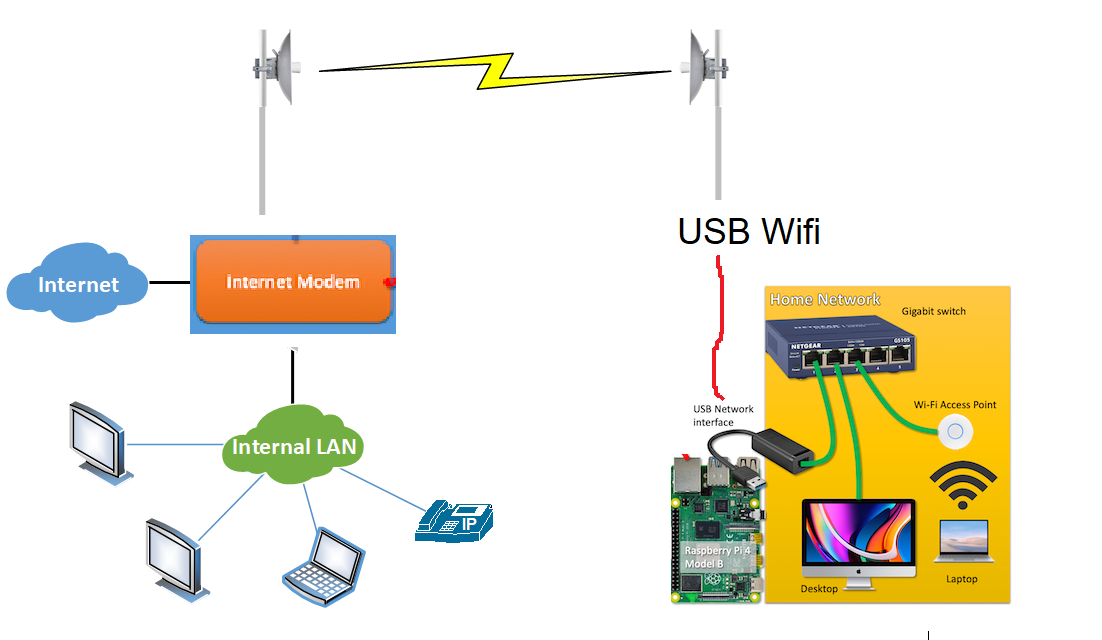
A little crazier, but more sane than this project, is using the raspberry pi as a router. There are plenty of people who have done this. I have referenced many of their projects, to make my Wifi bridge and router. If you proceed, it will help you, if you read their articles(link below), to get acquainted with the ideas.
…Now we return to our regular scheduled program with Mr Hyde
(Y/N)
Did you read the blog article about turning a raspberry pi into a router? The purpose of a router, is to physically divide the IP space, and to enable communication between them. That is, on one side of a router, all the devices have IP addresses 192.168.1.X. On another port, it will have addresses 10.0.1.X. And on another port, it will have all devices with IP address, that don’t match the other two physical ports. Typically routers connect to switches, and that is a subnet. A subnet is a collection of computers that share IP addressing 192.168.1.X “prefix”. Your home router has one virtual subnet, which all your devices connect to. And the port that connects to your ISP, is the WAN port that has all the computers that “don’t match your subnet”.
Wifi repeaters extend the subnet, and therefore the broadcast domain
There is Linux software to mimic the behavior of Wifi repeaters to overwrite the MAC address of it’s clients, with it’s own, to get around the association problem. we will not be using this software, as it extends the broadcast domain, or every device has to be on the same subnet. So it uses a different process flow for each data packet. This workflow, it even is acceptable to broadcast the data inside to all ports, except the one that the data was received on, if it isn’t sure which port has the appropriate MAC address.
We use routing capabilities in Linux instead. Which it relies on the IP address, and it’s routing tables of IP prefixes to the physical port, to determine where to send the data. This allows us to keep our own subnet, plus gives us the ability to add NAT, which is the IP address version of what wifi repeaters do. Instead of replacing the MAC address, NAT replaces the source IP address, with the router’s. This is a necessity, b/c w are using private IPv4 addressing, which means the IP addresses of all our subnets, no computer in the internet knows where that is, and it only has meaning within our subnet. You might even see a explanation of NAT in your home router’s webpage, though it is usually seamless and automatically on to translate your private IP addresses, into IP addresses that has meaning to either the internet, or at very least your ISP.
This project essentially turns a Raspberry pi, into a combined Wifi client and Router. Why? B/c I want to keep IP addressing of my network behind the Wifi-bridge the same, regardless of what AP or Wifi Router it connects to. Typically, the IP addresses handed out by home wifi routers, to the subnet which your devices connect to, start with 192.168.1.X, but not always. I want to keep my 10.1.2.X subnet, no matter what wifi I connect to.
A wifi repeater can’t do this. All the devices on a Wifi repeater, have to be on the same subnet as the AP or Wifi router, it connects to. If you connect to a AP that uses 192.168.1.X, then all your devices have to use 192.168.1.X. And if you change to a AP that uses 172.16.1.X, all your devices have to use 172.16.1.X, or those devices won’t work. Very rarely do most people, change AP that a wifi repeater connects to. So this type of device, is rarely, if ever, made into a consumer device.
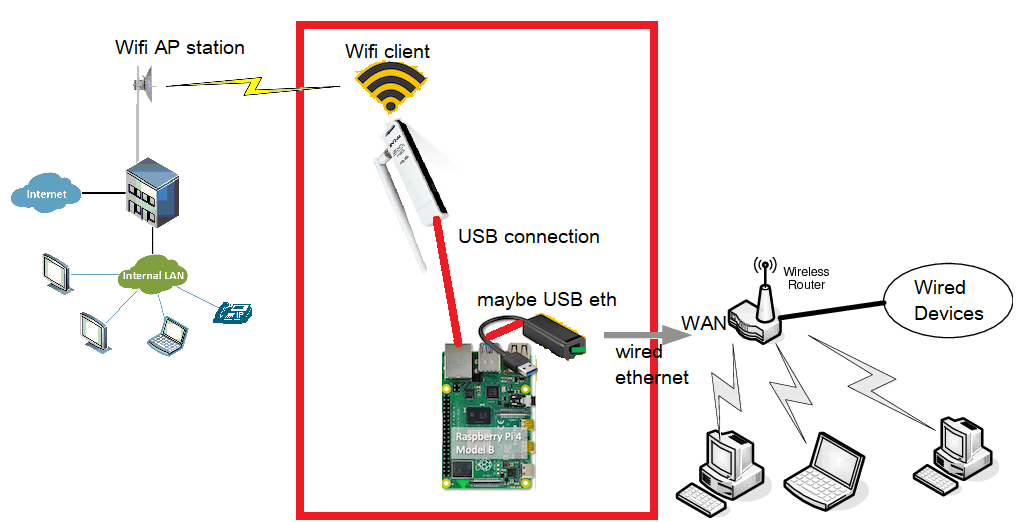
You can actually imitate what we are building in a single pi, with 2 pieces of consumer electronics (below). One Wifi repeater for client connectivity to a remote Wifi AP, and one consumer Wifi Router for it’s routing capability.
Evil plan:
In the raspberry pi, we are building Wifi connectivity, and building routing to the wireless connection for internet, for all the wired devices. Like any wireless client, it will connect to any AP, it is nearby, so theoretically we can point to several Wifi sources. Once we have connectivity to a wifi, it will route to our wired subnet whose IP addresses need not change, to coexist w/ the subnet requirements of the Wifi AP we connected to. We will accomplish this by building in NAT capability to make all our devices look like the RaspberryPi on the Wifi subnet, like any consumer Wifi router does for the ISP network.
Unlike the repeater and wireless router combo mentioned previously, if we need access to devices behind the NAT, the raspberry pi actually can have several static IP address on the wifi AP’s network, and we can configure it to forward each IP address to specific IP address in our subnet. Not just port forwarding as most consumer Wifi routers do, but actual static NAT.
I might as well reference his page,
since I’m stealing his diagram.
Another pi router, but w VLAN
Then as a phase 3, we will add the ability add a USB tethered smartphone and share it’s internet, and automatically switch internet to flow to it, if the Wifi connection gets congested.
Equipment:
Phase2
Phase3
Software and Configuration:
Raspbian Linux
sudo apt-get install iptables
sudo apt-get install bmon
sudo apt-get install tcpdump
sudo apt-get install iptraf-ng
This project will not install DHCP on Raspberry Pi
We will NOT be installing DHCP on Raspberry Pi, b/c we will use static IP between pi and a consumer router. But if you insist, and you think you know enough to know what you are doing:
sudo apt-get install dnsmasq
https://xavier.arnaus.net/blog/quick-dns-server-on-a-raspberry-pi
And you still need a switch, and if you plan to have pi provide Wifi AP services, you have to configure that too (Hostapd).
https://learn.sparkfun.com/tutorials/setting-up-a-raspberry-pi-3-as-an-access-point/all
or maybe this will work for you
https://www.tomshardware.com/how-to/raspberry-pi-access-point
No shame not using DHCP
When I graduated college and connected all my devices on network before WAN became mainstream, all my devices had static addresses, even before I had a good understanding of TCP/IP. It is manual heavy process, and why it is automated w DHCP today
In case you don’t know what you are doing, DHCP enables devices connected to router, to automatically get IP address and configuration. But this means you have to enter the correct DHCP configuration on the RaspberryPi (acting as DHCP server), for the devices you connect to it, to download the correct configuration, and work correctly on your network
Procedure
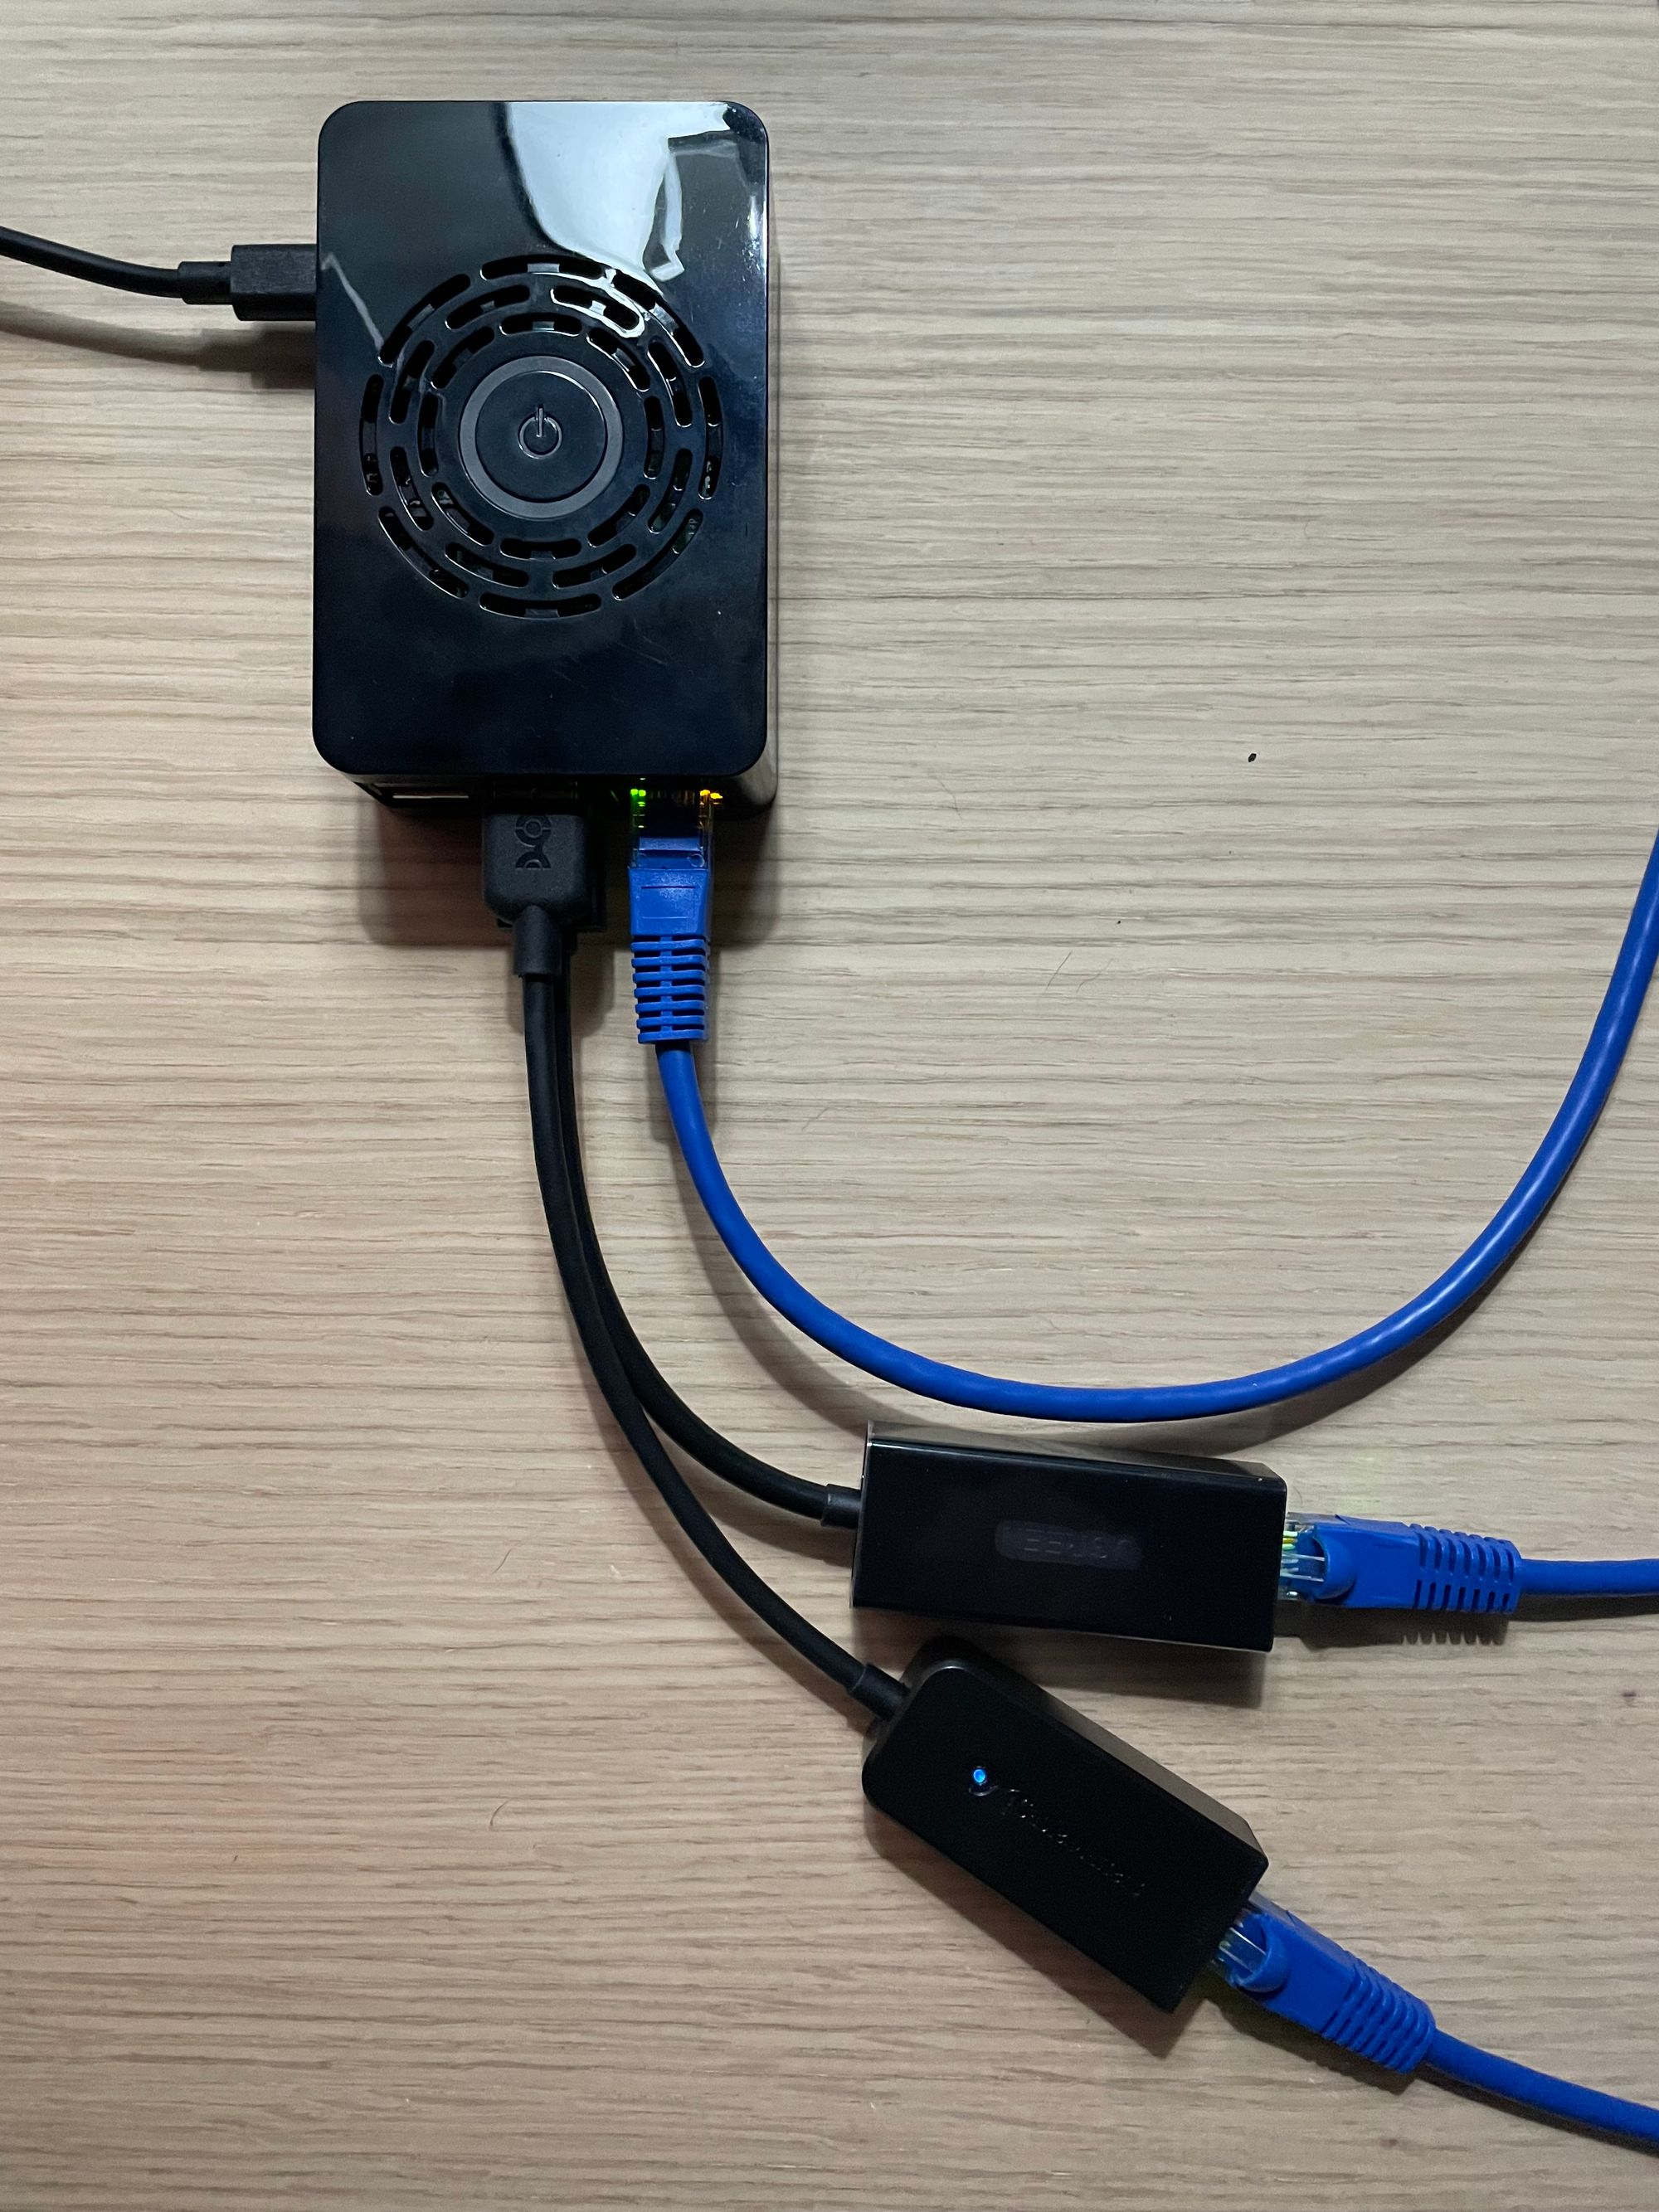
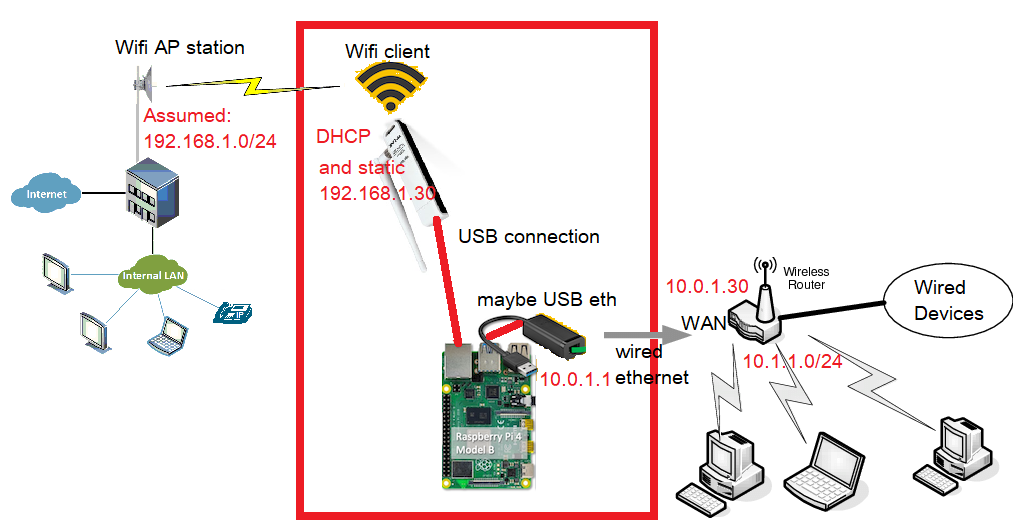
1. Connect your pi as so (in red box, rest is context)
Caveat 2. Not all USB wifi adapters support Linux, much less has drivers built into the kernel for the Raspberry pi version of linux. You may have to search around and look. I had to use the TP-LINK TL-WN722N, and downgrade my Raspbian Linux to version “Raspbian GNU/Linux 9 (stretch)” (yes, downgrade) to find a Linux version w a driver that will recognize that USB wifi.
If you suspect you have problem with Linux detecting the USB Wifi, to see all devices on USB:
lsusb
To see all devices recognized as network interface:
ifconfig
To see all devices recognized as wifi NIC:
iwconfig
If you see:
USB wifi device
a wlan0 interface
a wlan0 interface, not associated
respectively, then your Linux recognizes the USB device as a Wifi NIC. And the wifi device requirement is fulfilled.
Caveat 3. The B models of pi have a ethernet port built in. The B models consume more power than the A or zero versions. But if that doesn’t matter, feel free to use the built-in ethernet port, instead of the USB one. The built in wired ethernet port for pi is either spec’ed to older 100Mbps or mainstream 1Gbps, but the pi is very underpowered and it’s USB bus can’t handle even the 100Mbps transfer from wireless, to wired. So use whichever in more convenient. If you have a $80 pi4, or $140 pi5, maybe the IO bottleneck has been resolved. But it’s $80-$140, to tinker. And they are power hogs. Versus $40 for a wifi-ac router, with not as much functionality, but faster and more power efficient for the purpose that it was built. I am not a pi enthusiast. It just happens to be a good tool, if you want low power, with a lot of functionality.
If you suspect you have problem with Linux detecting the USB Wired Ethernet NIC, follow the procedure above to verify that Linux recognizes it (except for iwconfig). If at any step, Linux doesn’t recognize the device, you need a different version of Linux, or the device is not supported. And you might have to go find in the wilds of the Internet to look for a driver. I recommend finding a compatible device over trusting a man over the internet offering you something for free.
1a. You might connect a device to the ethernet port of the pi, if you wish, to test the forwarding works, after the configuration is all done. Give this device, a IP address, like 10.0.1.100, mask of 255.255.255.0, gateway of 10.0.1.1 (the raspberry pi’s eth0 IP address), dns is 8.8.8.8, 4.4.4.4 (Google)
2. Connect the pi to Wifi. You may have to execute
sudo raspi-config
and 1) turn on wifi and 2) boot into desktop environment. Reboot. Then in the LXE desktop environment, find the list of Wifi, and select your wifi, and enter the passphrase. This part should be the simplest. Execute
iwconfig
to see what AP you are associated with. Execute
ifconfig
or
ip addr
to view the IP address the pi received. Most consumer wifi router offer a /24 subnet, or a subnet mask of 255.255.255.0. This means that the first 3 numbers in IP v4 address in the devices in the subnet are the same.
And you should be able to ping Google
ping 8.8.8.8
thru the wifi connection
2. Configure the ethernet port, to be the “internet gateway” to the all the devices in the subnet we will configure the ethernet to belong to. Give the eth0 NIC, a IP address, like 10.0.1.1, mask of 255.255.255.0. Unfortunately, this isn’t as straightforward as it used to be.
In my olden model T days, 10 years ago, I could add into /etc/network/interfaces(https://wiki.debian.org/NetworkConfiguration):
    auto eth0
    iface eth0 inet static
        address 10.0.1.1/24
dhcpcd on RaspberryPi, isn’t a DHCP server
Please don’t confuse the two. dnsmasq is the software providing DHCP services, and I haven’t used it before. But plenty of people have. dhclient is the software that Linux uses, to get configuration from another DHCP server. dhcpcd is RaspberryPi’s network configuration manager, the equivelant of those dialog boxes you enter in Windows for IP4 address, etc.
If you are using a Raspbian that is more recent, it uses dhcpcd, and that file is /etc/dhcpcd.conf.
Ref: https://www.circuitbasics.com/how-to-set-up-a-static-ip-on-the-raspberry-pi/
interface eth0
static ip_address=10.0.1.1
At this point, if you connected your device, as configured above, you should be able to ping it
ping 10.0.1.100
And the device should be able to ping the raspberry pi’s configured IP address.
ping 10.0.1.1
If this doesn’t work, it might be because you use a USB wired eth adapter that doesn’t support autosensing crossover support. The easiest way to fix this, is to plug both the pi, and the device, into a ethernet switch. You can also buy a crossover cable, but that is a specialty item only computer specialty stores sell.
3. But your device, still can’t ping Google, bc we didn’t turn on forwarding.
ping 8.8.8.8
The above will not work on the wired device (though it should have been able to ping the pi).
To fix this, change /etc/sysctl.conf
and make sure this line is in it
net.ipv4.ip_forward=1
. If it is set to 0, change it to 1. If not there, add it.
Ref: https://raspberrypi.stackexchange.com/questions/40563/ip-forwarding-and-routing-rpi-2b-jessie
What you don’t see, is
ip route
There are lines there for 10.0.1.0/24
and there are lines there for 192.168.1.0/24 (or whatever the wifi subnet is)
and there are lines there for default.
Something like:
default via 192.168.1.1 dev wlan0 src 192.168.1.104 metric 202
192.168.0.0/24 dev wlan0 proto dhcp scope link src 192.168.0.200 metric 202
10.0.1.0/24 dev eth0 proto dhcp scope link src 10.0.1.1 metric 202
When you configured the eth address, linux added the route for the subnet for 10.0.1.1/24’s subnet, which is 10.0.1.0/24.
When linux connected with Wifi, the linux process (wpa_supplicant) first connected to wifi, then got an address from DHCP from wifi network(ie. 192.168.1.104), and assigned route for the wifi subnet, which I assume the most common value is is 192.168.1.0/24. Also when it connected to wifi, the DHCP also provided a gateway address. The gateway address (192.168.1.1), is what shows up as default.
This is how linux decides to send a packet, after forwarding has been turned on, that wasn’t addressed to it.
4. ping 8.8.8.8 should still NOT work. The reason for this b/c the wifi network has no idea what your subnet is, so it can’t send responses back. And though commercial routers can be configured to, consumer home wifi router don’t care what your subnet is, and it can’t be configured to. So we are going to trick the Wifi network’s router, that all our wired devices on our 10.0.1.0/24 subnet, belong to their 192.168.1.0/24 subnet, and we will do this by turning on NAT. This will convert any 10.0.1.0/24 address going to wifi, to pi’s wifi address which is on 192.168.1.0/24 subnet.
iptables -t nat -A POSTROUTING -o wlan0 -j MASQUERADE
iptables -A FORWARD -i eth0 -o wlan0 -j ACCEPT
iptables -A FORWARD -i wlan0 -o eth0 -m state --state RELATED,ESTABLISHED -j ACCEPT
Ref: https://www.packetswitch.co.uk/raspberry/
At this point,
ping 8.8.8.8
, should work, if you can ping 8.8.8.8 on the pi.
5. Save your changes to iptables
apt-get install iptables-persistent
iptables-save>/etc/iptables/rules.v4
Ref:https://www.thomas-krenn.com/en/wiki/Saving_Iptables_Firewall_Rules_Permanently
It has to be said
NAT described as a security feature, is like someone selling you a wall without a door, is a security feature.
However, I myself, have described it as such, in the past. Maybe I should’ve sold walls for a living.
6. Just like your Home wifi router, your devices are inadvertently hidden from connection attempts from the “Internet side”, bc the NAT mechanism takes this feature away (which always sold as a security feature). If you want access to your wired devices, from the devices connected to wifi, you have to essentially give the give each device you want access to, a new IP address in the wifi network. This is done by adding additional static IP addresses to the raspberry pi, so that it has multiple IP addresses, and determining which of those will be directed to your device.
So we will configure the RaspberryPi with both a DHCP address, and then add a static address for same network. Then tell Linux, to forward all packets to the static address to your other device on the other network interface.
A. 192.168.1.104 was address given to raspberry pi’s by Wifi router
B. You add 192.168.1.30 to raspberry pi’s Wifi
C. You tell raspberry pi, anything sent to 192.168.1.30, gets sent to 10.0.1.100
D. From wifi network, you can try to connect to 192.168.1.30, and it will try to connect to 10.0.1.100 on your wired network
This is called static NAT by Cisco, as a feature in its commercial routers.
This is how you do it
Add ip address:
sudo ifconfig wlan0 add 192.168.1.30
Add rules to iptables, to do the static NAT
sudo iptables -t nat -A PREROUTING -i wlan0 -d 192.168.1.30 -j DNAT --to-destination 10.0.1.30
sudo iptables -t nat -A POSTROUTING -s 10.0.1.30 -j SNAT --to-source 192.168.1.30
To read more about static NAT: https://www.geeksforgeeks.org/difference-between-snat-and-dnat/
Now you should be able to at least ICMP or ping to 192.168.1.30, and it will ping your test host. Even better, if your test wired machine has web server, load it up, and visit it via web browser http://192.168.1.30
If raspberry pi’s wired ethernet is connected to switch, now anything connected to that switch can potentially be given access, by following the procedure above, for each device.
The easy way
I have shell scripts that will do the work of enabling routing/NAT, and Static NAT
https://github.com/studio-1b/Enable_Linux_as_Router
git pull https://github.com/studio-1b/Enable_Linux_as_Router.git
But you really should know how to read software, before executing it.
Phase 2
Up to now, we have given access to wired devices connected to RaspberryPi, access to your neighbor’s Wifi, and not needing to change IP addresses, if you connect to another neighbor’s Wifi.
7. What if you want give wifi access to you wifi devices, but want to connect them to your neighbor’s AP, bc their AP is too far? Then connect a Home Wifi router’s WAN port to the raspberry pi’s wired ethernet port (where your test device was connected to), and goto the router’s configuration and manually change the WAN or Internet configuration from automatic DHCP, to static address. Then change the values to match the IP address for the test device (ie. 10.0.1.100, etc). You might want to change the subnet of the router, not to conflict the other 2 subnets, though it doesn’t really matter, if don’t plan on directly connecting to any device on your subnet. Every other configuration is fine w the defaults on the new wifi router. Anything plugged into the new wifi router, will get an address from it’s DHCP, and it will be translated to 10.0.1.100 (the router’s WAN address) when it gets sent to pi, and the pi will translate one more time to the Wifi subnet address it got from the Wifi network.
If you’re a visual person, if phase 2 complete, the addressing is in red, in diagram below:
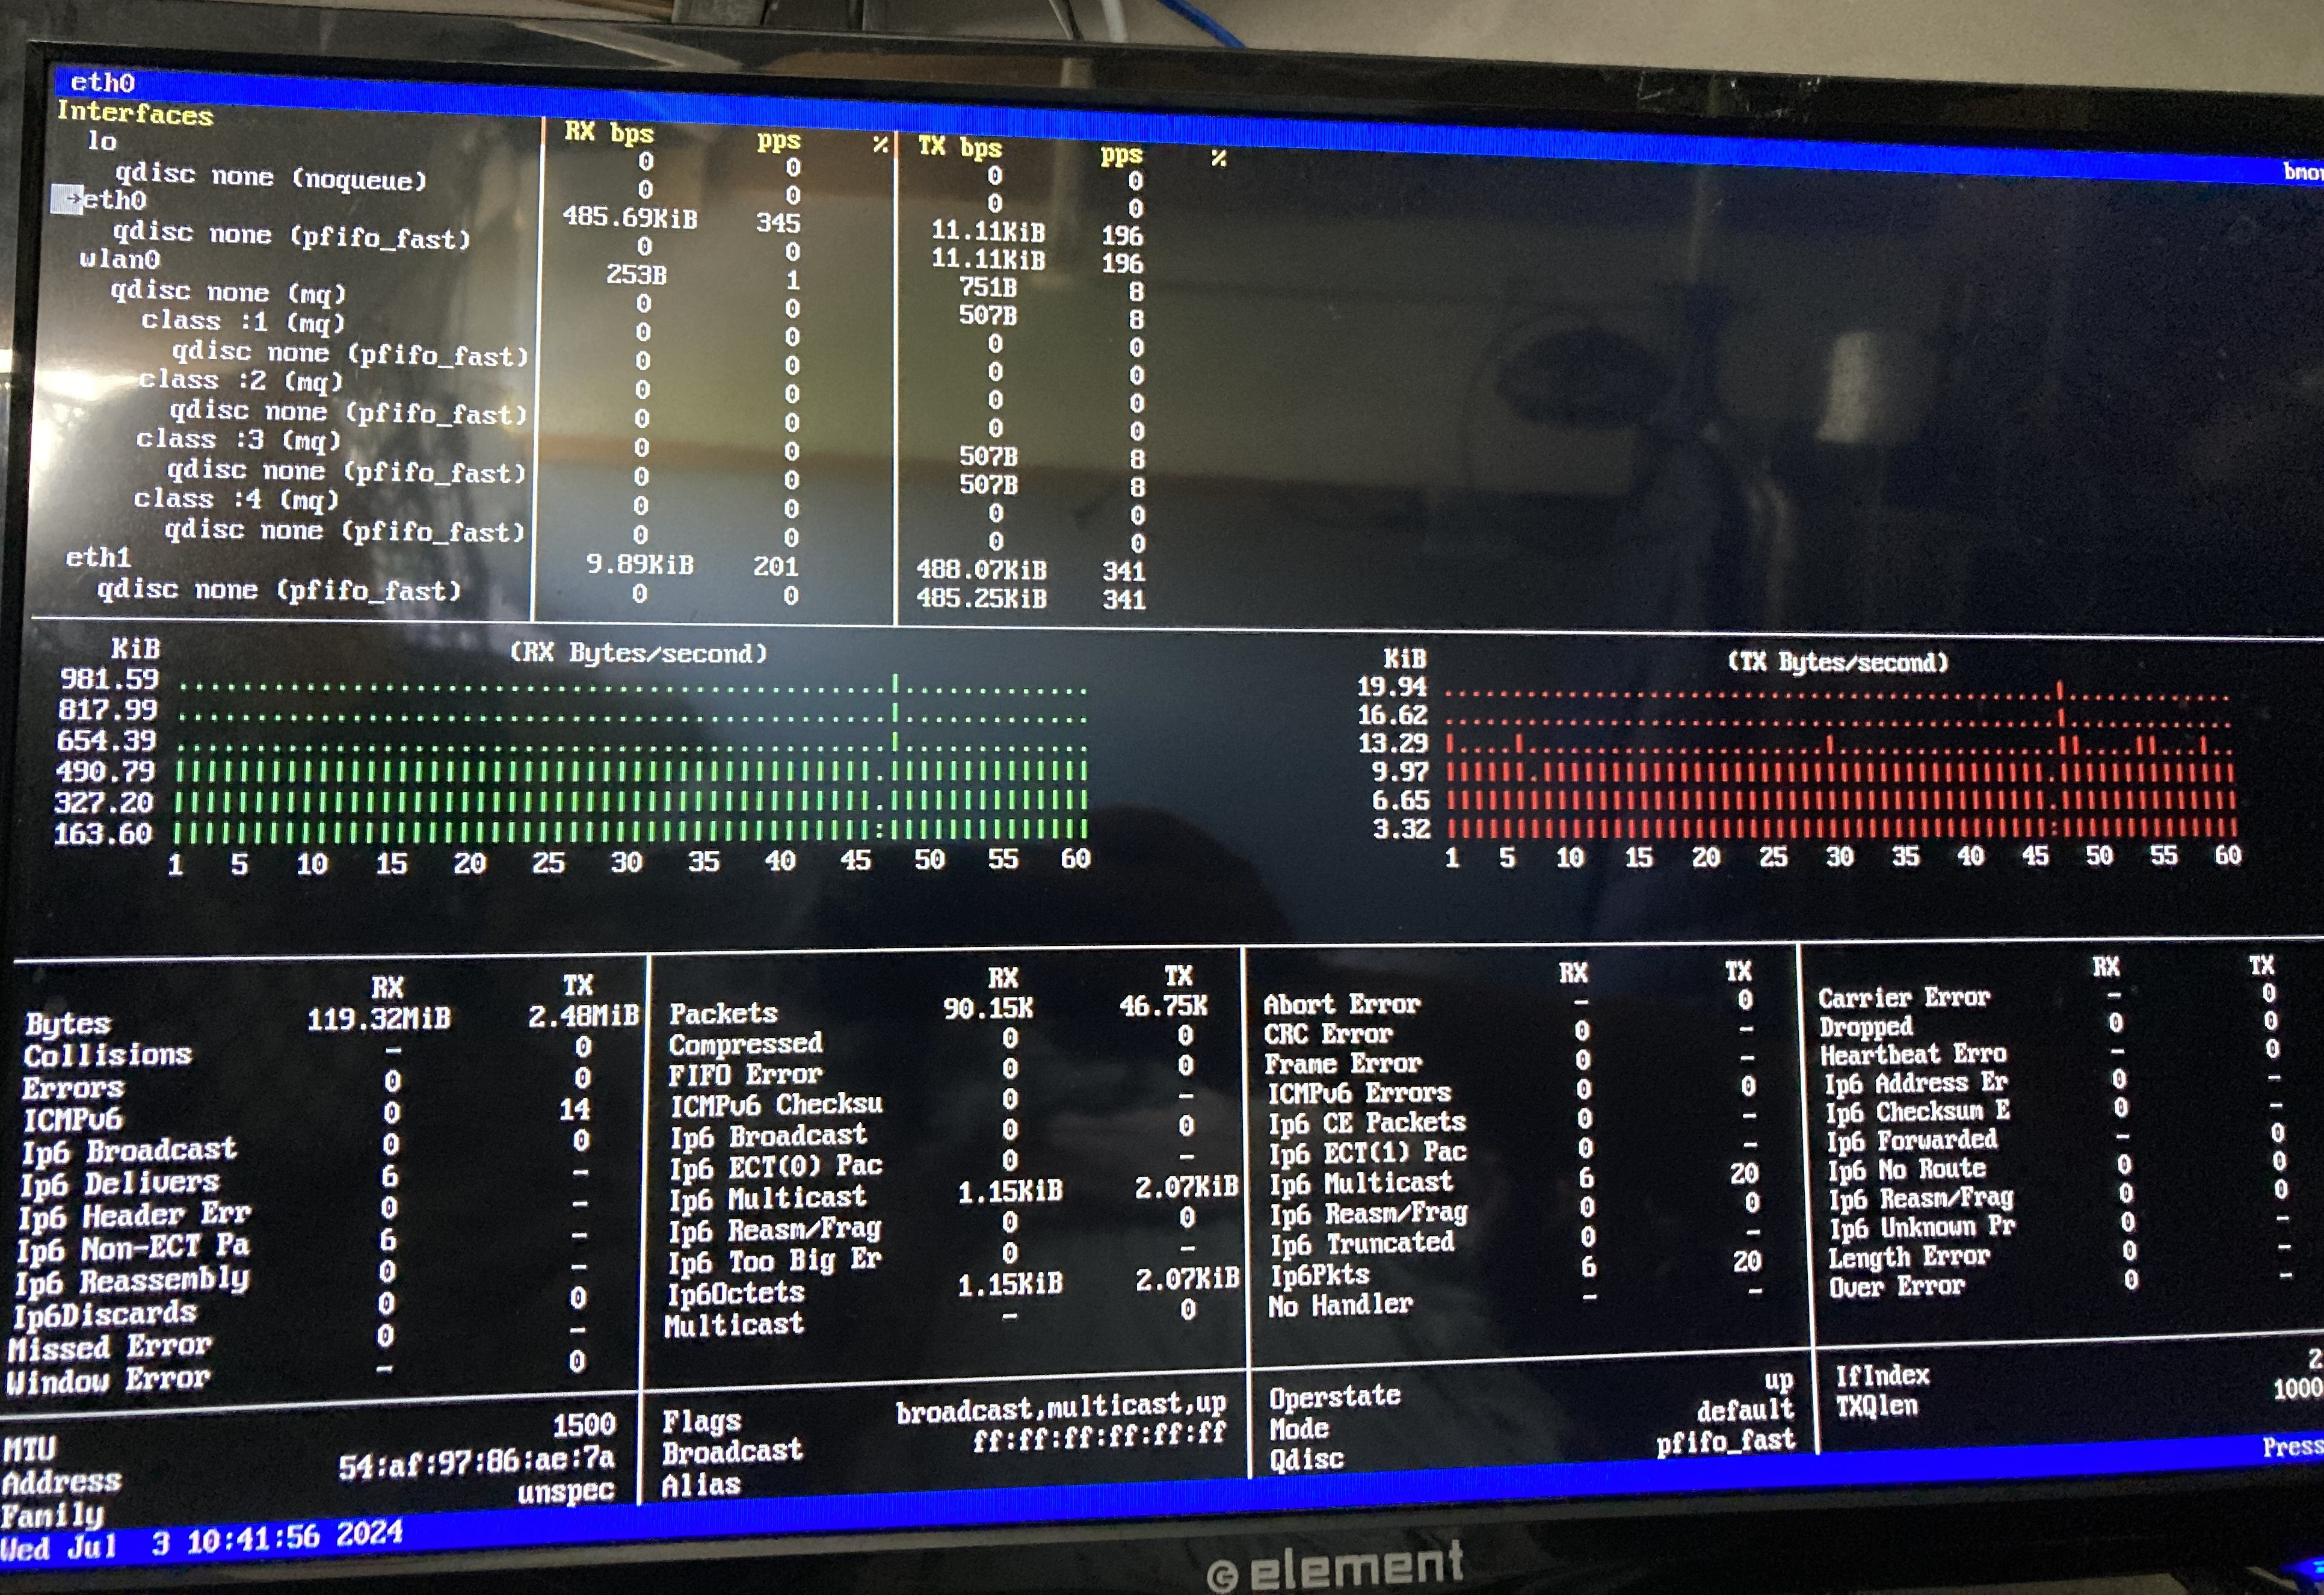
Results below:
Linux PC are typically more expensive and power hungry than home routers. But not the pi. however, the pi, is remarkably underpowered. It’s I/O is confined to the USB bus, which it’s implementation of, it cannot saturate a the maximum USB2 speeds. About half. And that IO is shared among all IO devices, including all the networking interfaces. This isn’t a problem if the primary interface is wifi, bc wifi is a bottleneck that will never saturate any part of the pi, much less the USB bus. It didn’t even register a CPU increase of 2%, when I was watching netflix at 70Kbps. And that might have been noise.
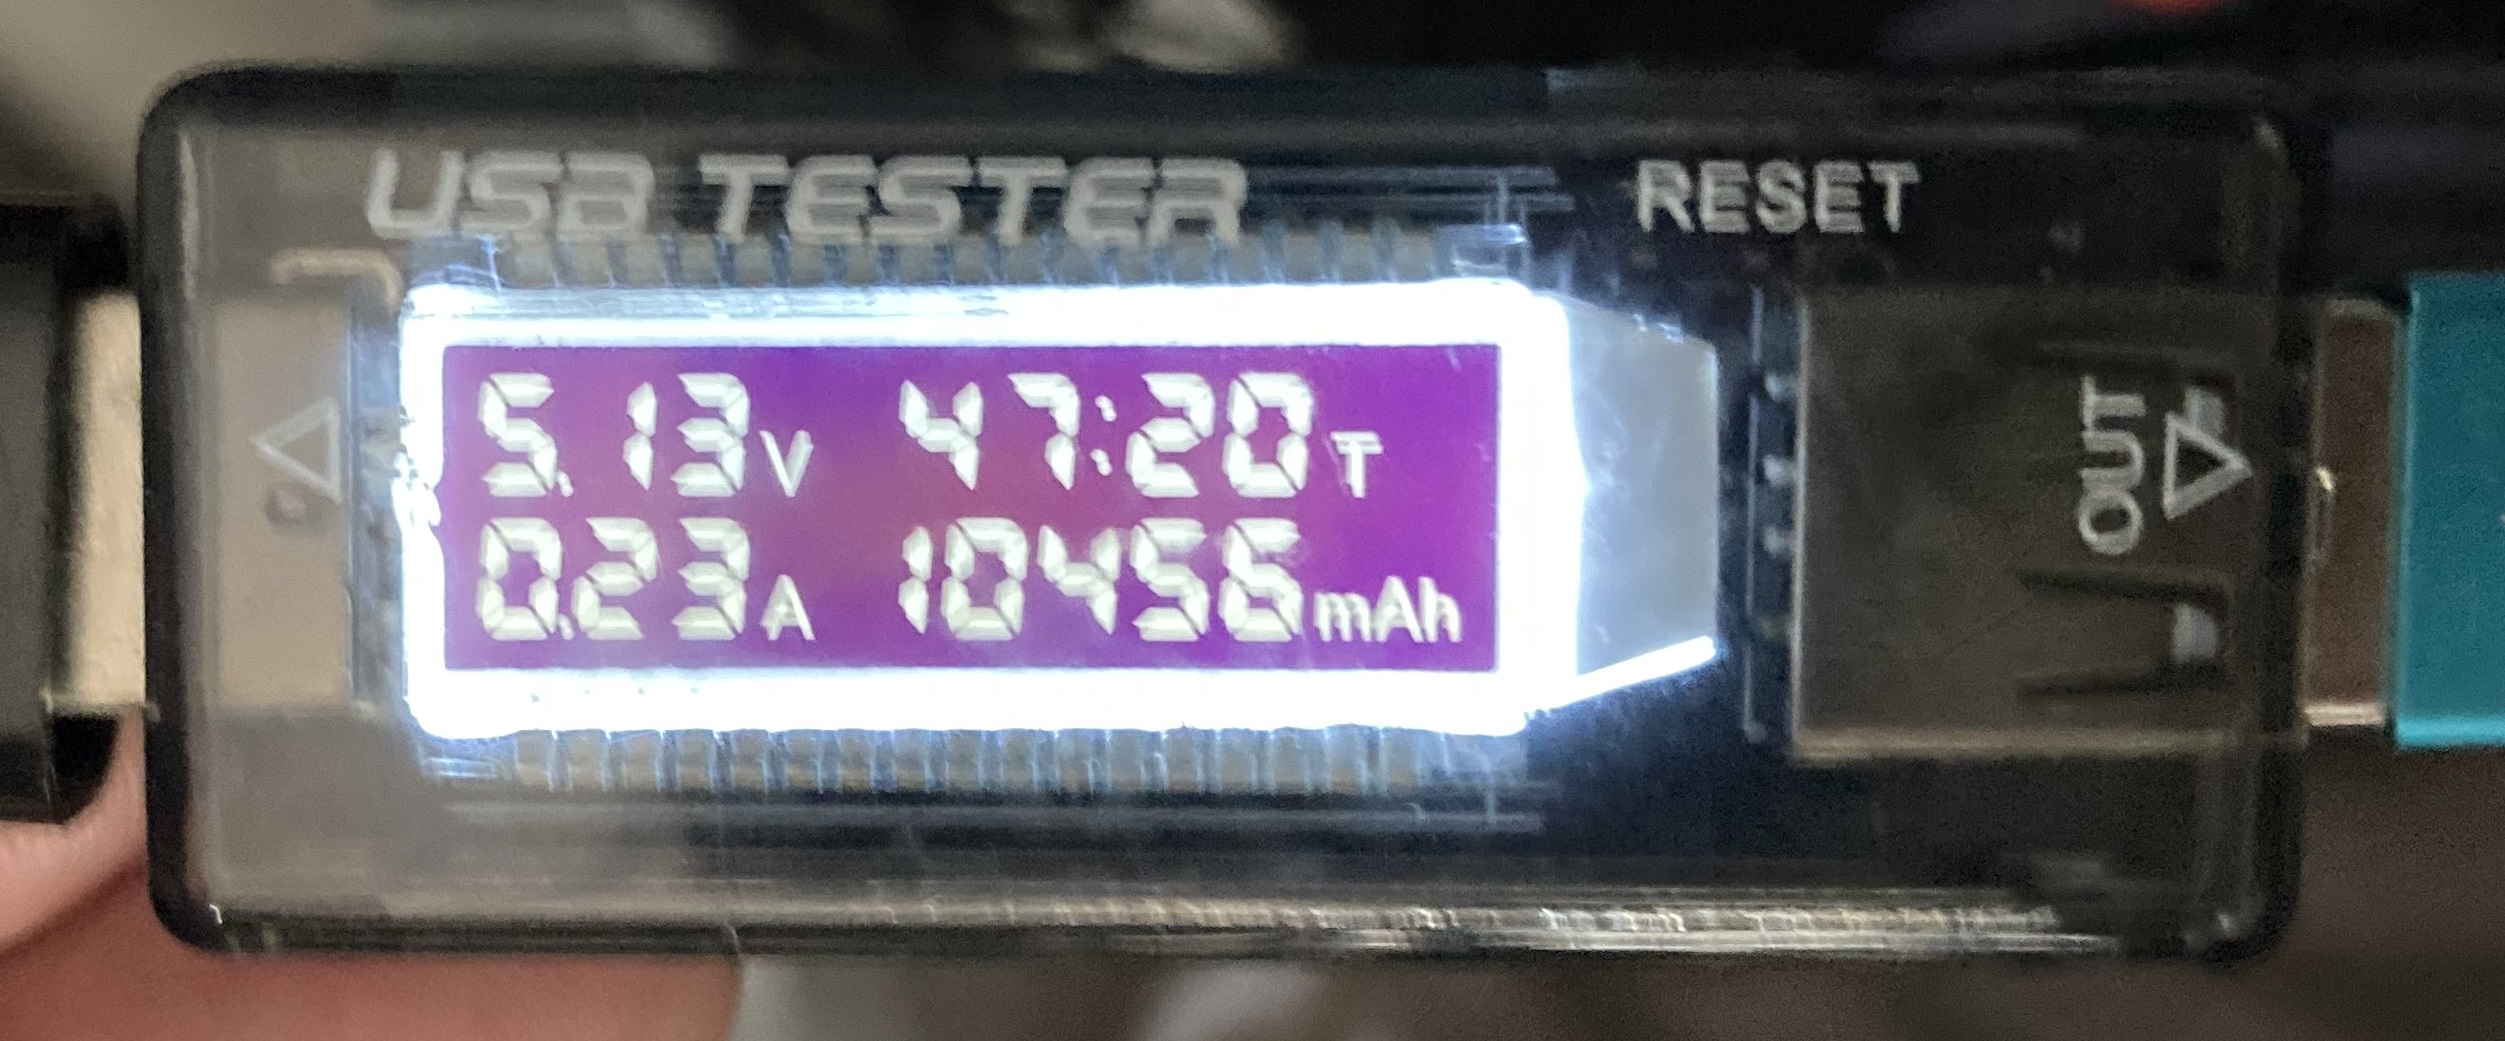
AND REMEMBER, you only had to do this b/c you insisted on borrowing wi-fi, rather than paying $150 for cable modem yourself. I hope it was worth it. B/c my desk looks like a mess, while this is wired. Here is perspective:
Update 7/2/2024: A Pi Zero with no Wifi and no bluetooth, with USB hub connected with 1x USB Wifi and 2x Ethernet expends 230-millamps of power.
But I have yet to get more than 490KBps(x8, ignoring overhead, that is 3.9Mbps), thru this device, even between the wired interfaces.
| USB2(older but on pi zero) has max of | 480Mbps. |
| Pi3B has maximum of | 321Mbps. |
| Pi2B has maximum of | 214Mbps. |
| Wifi-n has maximum of | 150Mbps. |
| Old Ethernet 100BaseT has max of | 100Mbps. |
| And real world one way wifi test on pi zero claims 20Mbps, so on a router where everything that comes in, goes out again, that occupies the USB bus twice as much for same data and it should reduce routing bandwidth to | 10Mbps. |
| The pi zero router (This project) | 3.9Mbps. |
This is remarkably unimpressive, but surprisingly still functional.
—————–
TBD
Phase 3
TBD
Phase 3: Still a work in progress.
usb tethering isn’t available in early pi Linux version
I haven’t been able to verify this man’s claim about routing metrics, are broken.
https://www.jeffgeerling.com/blog/2022/network-interface-routing-priority-on-raspberry-pi
But this was the last part of the evil plan.