Warning: This install.sh, feels like a hack, b/c it uses “docker-compose up” to initially run the containers, so it will create the folders and permissions correctly, and then you will terminate the install with 1x press of Ctrl-C, and docker will terminate, and the rest of the script will install
Self-pitying Exclamation
of how this wasn’t as easy as it seemed.
Feel free to skip to the WordPress install, if you don’t want to read about technical details that a programmer needs to look into.
WordPress was actually the real Capstone implementation for my course. I still didn’t get to implement it the way I wanted, b/c doing the configurations by hand is easier and much faster. And allows you to dynamically deal with situations, that were not anticipated, but this means it was undocumented. I wanted to write a shell script to do it all. Creating automation is expensive on time, and depending on the application, on materials as well.
Same problem to solve (opensource application clustered in Docker Swarm), as in part1, which was an aborted implementation of OwnCloud, redone. This time, we implement WordPress.
This post is where we implement WordPress on a Docker Swarm cluster. Actually deploying OwnCloud on Swarm cluster is easier, as long as you understand you have to turn off “chown” and set the “trusted_domains” variable to allow visitors from outside the local computer. It seems actually designed with possible clustering in mind, for the front-end.
What is a Session?
Though, it is commonly called a HTTP Session, I don’t believe it is specified in the HTTP white paper specification. That is, I don’t think there is a standardized HTTP header/cookie-key for keeping sessions.
Sessions is the nomenclature for a wide range of technologies used to identify you, from the millions of other visitors to a website each day. Most websites, treat everyone the same. It can’t tell the difference and it wasn’t designed to.
When a website implements session technology, it gives your web browser a unique cookie (or in some advanced cases, differing URL) identifying you, as you, different from everyone else. It can do this anonymously by tracking your usage. Though it is mostly commonly used for customized content, or logging into your own control console on the web.
The problem was that all early iterations of session technology, only one web server knew what your session cookie was. So only one server, knew you were you, and it didn’t share how to tell you apart from everyone else, with other webservers in a webfarm.
WordPress has this problem.
But only has this problem when you are adding or updating content. But people reading your blog, it doesn’t treat any different from anyone else. And if there was 20 web servers in a webfarm, serving out pages, to exact same way to everyone, to read, there is no problem. I don’t know of any other way that WordPress using sessions, other to keep track of who is logged in.
There is no sessions issue in WordPress
(Correction, 4/30/2024)
Wordpress DOES NOT use the PHP session mechanism. It stores it’s login sessions in the database. I had preconceptions based on all the previous software I worked with, that put login status in sessions. I saw that logins were not persisted between the Swarm replicas, during the initial setup. I assumed that this was b/c wordpress had a session server implementation, that I did not implement. When I tried to implement it (it is called memcacheD, or I read you can use redis too), I read WordPress did NOT store sessions in PHP session. But in the MySQL database. And I verified this by checking the PHP sessions were not created upon login.
The problem in Swarm replicas in keeping the WordPress login session (it redirected to home page, upon clicking on links and submit buttons in wp-admin), likely had to do with one of the other issues below. B/c this issue doesn’t not occur, in the swarm 3x replicas created by this current install script. I changed wp-admin/index.php to show echo $_SERVER['SERVER_ADDR'] just to be sure, and as result, the browser displays the different docker network addresses of the 3 replicas in the admin dashboard, when docker round-robin rotates the HTTP request to different replica, when hit refresh on the browser. And it no longer redirects back to the homepage. So, you do not need a separate image and container, to support WordPress logins. It will work just fine, accessing http://<any-swarm-worker-host-ip>:<forwarded-port>/wp-login.php.
The sessions issue
Wordpress is a simpler design, and while this sounds like it might be simple, to scale into a cluster, one thing keeps this from being simple : sessions. Sessions in WordPress are stored locally, only on the single webserver. Sessions are important for functionality where users login. And if the web user gets redirected to other webservers in a farm or cluster, it won’t have the session. And won’t know the user was logged in. And editors and publishers login to WordPress.
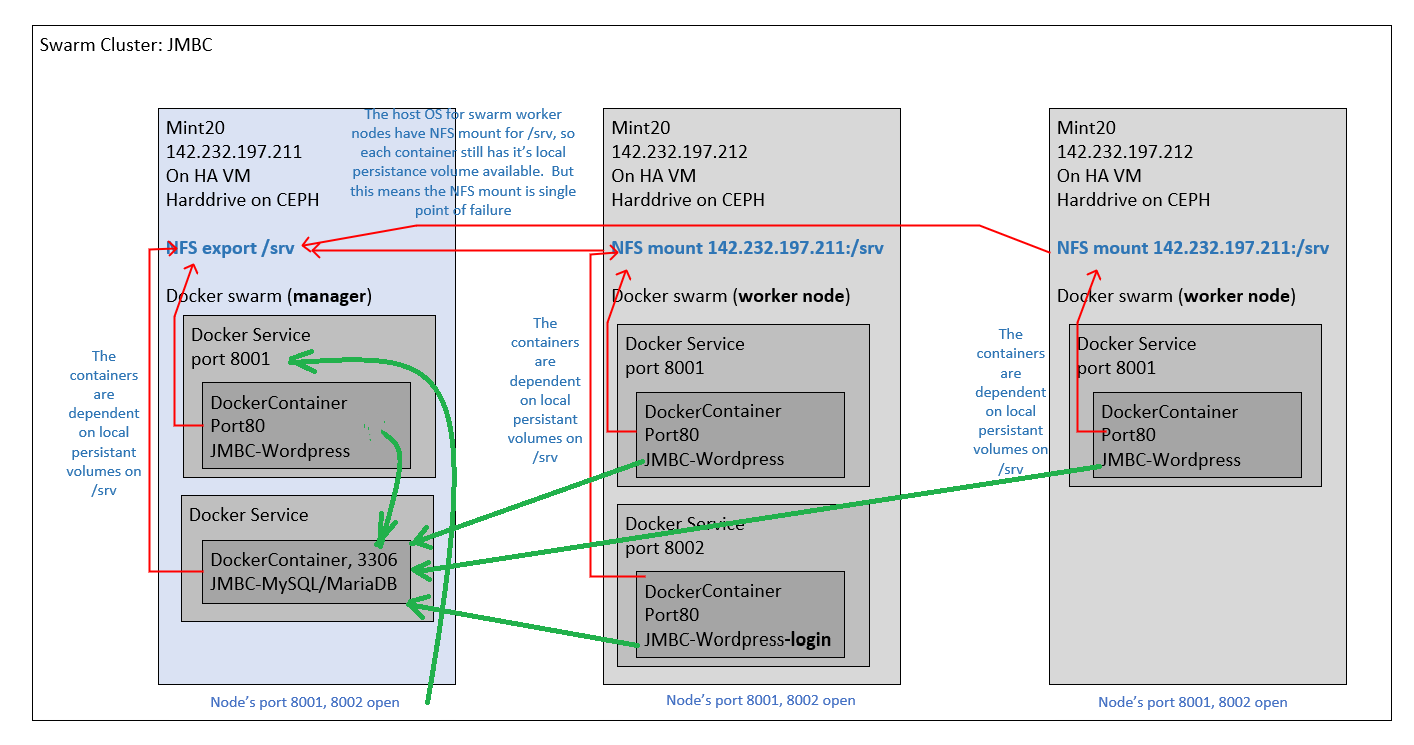
We are under the assumption that our WordPress cluster’s primary source of load and work, will be to serve pages to readers. So we will potentially allocate multiple nodes in the cluster to that task. And that task doesn’t need sessions to be shared between servers. So at least 3 replicas of the WordPress container, will serve pages to visitors who read the blog. This load balancing between replicas will be served on port 8001.
One WordPress container, will have only 1 container replica. And anyone logging in, will use this container. This way, this container acts as a standalone web server, and it can remember sessions and logins for all visitors. This session-enabled site, will be serviced on port 8002.
Why the install script customizes the WordPress Container
If you look inside the install,sh, you will notice that it searches for a existing wordpress container, and saves it as a new image. Why?
Well, WordPress image when pulled directly from Docker, thinks it needs to recreate all the folders, and databases from scratch. While the replicas realize this doesn’t need to be done a second time, a container, pulled from same image, connected to same database and file volume, doesn’t seem to realize this, and it tries to re-install the database and files a second time. To get around this, instead of pulling the same image from docker, we save the WordPress container after it has created the database and files to a second container, and create our other container group published on another port, just for editors and publishers.
WordPress Container’s auto-detect installation issue
If you are using the WordPress image pulled from Docker, your persistant volume MUST map to the container’s “/var/www/html” and not “/var/www/html/wp-contents”. The reason for this is simple, the WordPress image assumes that every container is fresh and doesn’t have WordPress installed. It takes the slightest look at it’s “/var/www/html” directory for WordPress files and if it isn’t there, it fires off the install. Which crashes, once it encounters the wp-content subdirectory, which is supposed to contain some uploads. Since if you mapped to “/var/www/html/wp-contents”, it will look in “/var/www/html” and it will look empty b/c the files were created in the other container. Map to “/var/www/html” and the first container will save it’s files there, and subsequent containers, when the volume is remapped, then the wordpress installation will see the wordpress files, and not re-start a installation that is bound to fail. And re-use the files installed by the first container.
WordPress Container’s temporary files are stored in “/var/www/html”
So whatever volume you have mapped to the container’s “/var/www/html” has to have 777 access, bc the process that executing install scripts tries to create a file “sed…” in that directory. And when it can’t, it crashes the container.
WordPress has a single HOME_URL
If you try to access the same WordPress installation using multiple “HOST” headers, it will always redirect back to the one, where the installation set up occurred(which URL in browser, when you selected the language, site title, and username/password). When you type an IP address, that is in the “HOST” header. When you type a IP address with port, that is in the “HOST” header. If you used DNS in browser like “www.abc.com:8001”, that will be in the host header. If you set up on the localhost, WordPress seems initially forgiving about having a hostname different than the one it’s recorded in the database, but not the port. We set up on localhost:8001. When we tried to goto http://localhost:8002, it always 301 redirects back to http://localhost:8001. We needed to find a code fix, to prevent this from happening. We found it on Stack Overflow. It is in the “install.sh”, to change to “wp-config.php” to override any HOME_URL, with what was provided with in the “HOST” header. Thereby avoiding redirect.
MySQL/MariaDB won’t run on any other node, except a true local volume
The volume storing the MySQL files in container’s “/var/mariadb” will eventually have several files created by the MySql container. Three subdirectories must have 777 access or the MySQL container cannot start on worker nodes.
The files and permissions created by the WordPress and MySQL containers are not created correctly when the service creates them
If you try to skip “docker-compose up”, WordPress and MySQL container will try to create the files in the local volume, but they will never have the right permissions for access over NFS. Running “docker-compose up” first creates the files and folders with close enough permissions, to allow you make minimal changes to permissions, to allows other containers to access them.
Only the “WordPress Container’s auto-detect installation issue” is catastrophic, and only on reboot. The first container runs fine. Every other issue, it may look like WordPress works, but there is something abberent about the installation.
Installing a Docker Swarm
Please see http://www.tictawf.com/blog/owncloud-on-swarm-aborted-capstone-linux-services-project-redux/, and execute sections from “Create NFS share for containers to use” to “Configuring the Docker Swarm Worker Nodes” (inclusive). The goal is to create at least the Docker Swarm Manager and 1 Docker Swarm Worker node, of the docker environment below:
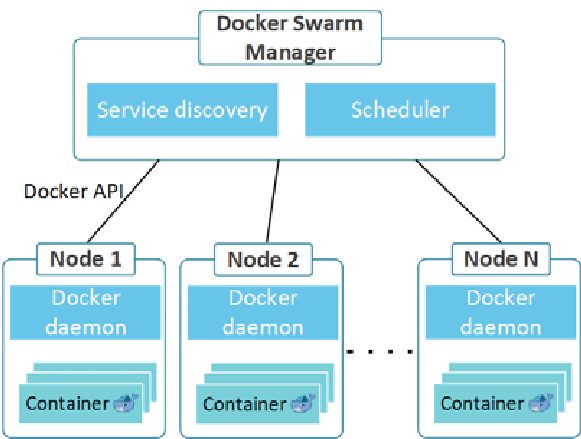
Once the necessary Docker Swarm nodes are installed with the required configurations, we can move onto the next step.
To install Docker Swarm, you need to install docker. Or what I did.
sudo apt-get install docker.io
Then on one Linux VM (I call mine swarm1), install the swarm manager. Swarm is Docker’s container clustering solution. It is simple enough.
sudo docker swarm init
It will output somthing like
Swarm initialized: current node (bvz81updecsj6wjz393c09vti) is now a manager.

To add a worker to this swarm, run the following command:

    docker swarm join --token SWMTKN-1-3pu6hszjas1
Copy the output from your command, and paste it into the other two Linux swarm workers. I named my 2x Linux swarm workers: swarm2 and swarm3. Unique isn’t it?
docker swarm join --token <output on your screen<
They both need Docker installed with sudo apt-get install docker.io before, joining the swarm cluster.
You don’t need a cluster to run WordPress. WordPress will run fine as a docker container on a standalone host. But a cluster will automatically handle failover, and distributing requests between multiple replicas.
Now to the main event: How to deploy WordPress on a Docker Swarm cluster…
Solution #2: WordPress on a cluster
Ripped off the Internet, WordPress architecture is simply described as:
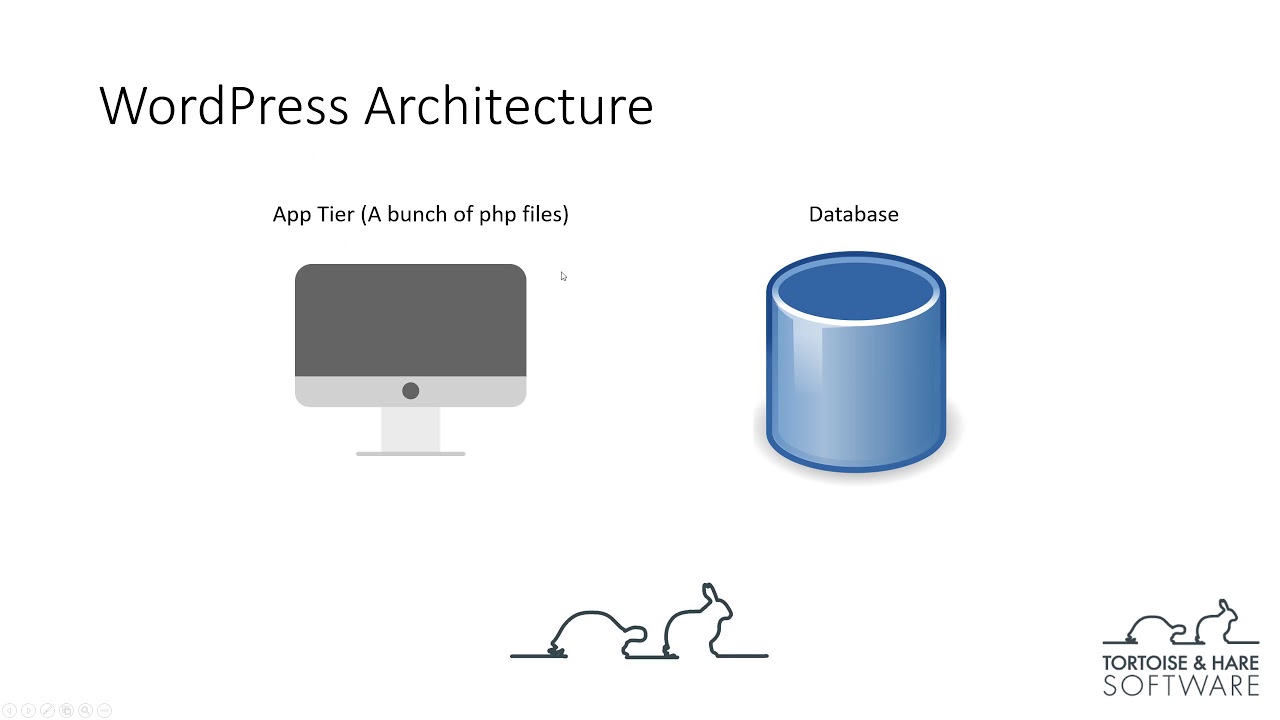
I wanted to make it look like:
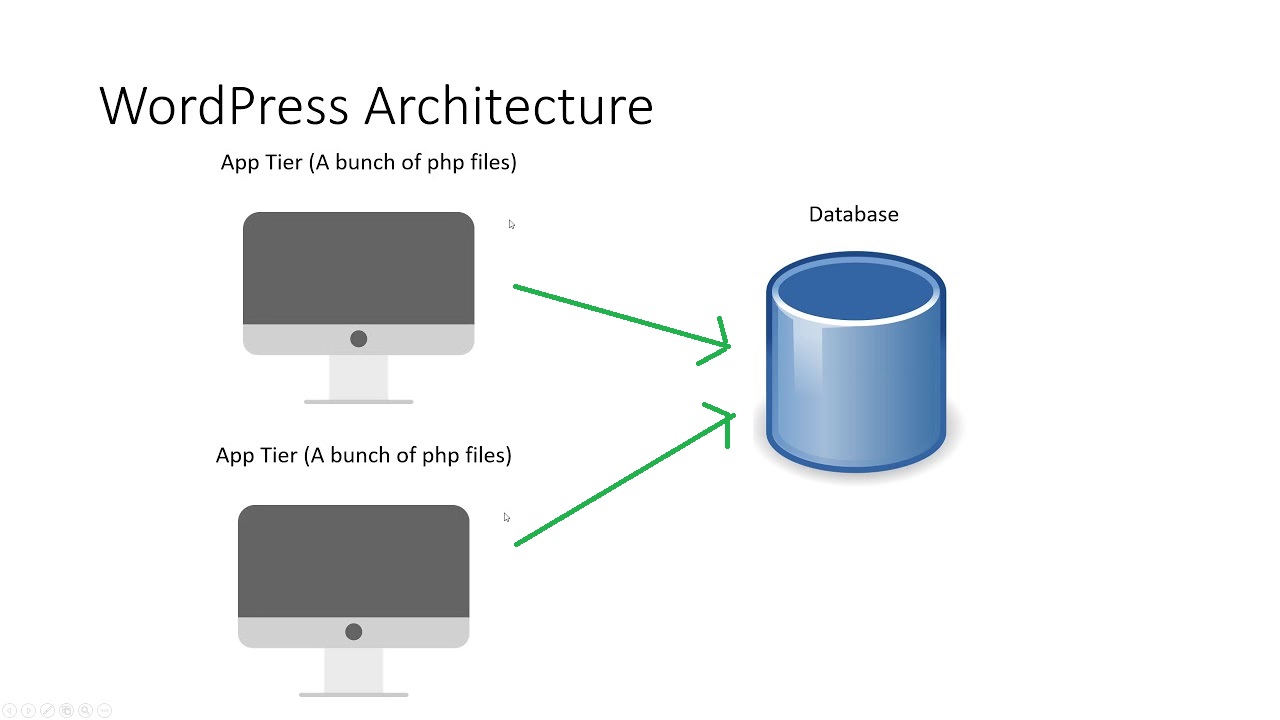
In fact, I want to implement it like this:
A “docker-compose.yml” (if you read my previous post) is a configuration file for a stack of containers and the software to be installed in them. I got my original “docker-compose.yml” from this gentleman’s blog(below this paragraph), if you want to read it. But I had to make many changes, to fit my NFS share situation. But for running 1 container using “docker-compose up”, it works right out of box.
https://blog.budhajeewa.com/deploy-wordpress-on-docker-swarm/
But running a container locally, isn’t what the last 2 posts are for. It is for running containers on a cluster. If you want the stack of container deployed on a Swarm Cluster, you will need to know the “docker stack deploy…” command, which is in “install.sh” that you can download by executing on the Swarm manager:
git clone https://github.com/studio-1b/Wordpress-on-DockerSwarm.git
It should have downloaded scripts to make it easier to configure the containers in the right order. It should have these files, in a “Wordpress-on-DockerSwarm” directory:
docker-compose.yml
killdocker.sh
fragment.yml
…
The “docker-compose.yml” file is copied from the site documented above. And it states that 1 WordPress container be created on port 8001, and one MySQL container be created. And that the container will store their important files in local volumes in “/srv”.
But again, the “install.sh” does the fine tuning, and is the file you will run, and it will execute the steps required to install WordPress on the Docker Swarm cluster. It starts “docker-compose up” to start the containers locally (which you will see logs outputting), but this has the intended effect of creating the local volume folders correctly. So we cope up with this hack. You have to keep visiting “http://localhost:8001/” until you receive the setup screen(where it asks you what language). Then you return to the install script and press Ctrl-C ONCE to terminate the logs (and the local containers). When the containers terminate, the “install.sh” continues. It creates the 8001 container service and MySQL, from “docker-deploy.yml”. It builds a port 8002 container service, with the “fragment.yml”. And increases the replicas of the port 8001 containers to 3, to load balance between 3 worker nodes. It updates the fixes for the issues listed above, which is both permission issues with chmod, and some code changes in PHP to “wp-config.php”.
The “killdocker.sh” file can be execute by “killdocker.sh data” to uninstall the wordpress containers from Docker Swarm AND delete the data from the local volumes.
So run the command below now, so it can install WordPress, as described in my diagram above. As of 5/27/2023, this script should work w/ the WordPress Docker Image pulled from the internet.
./install.sh
The installation process should look like:
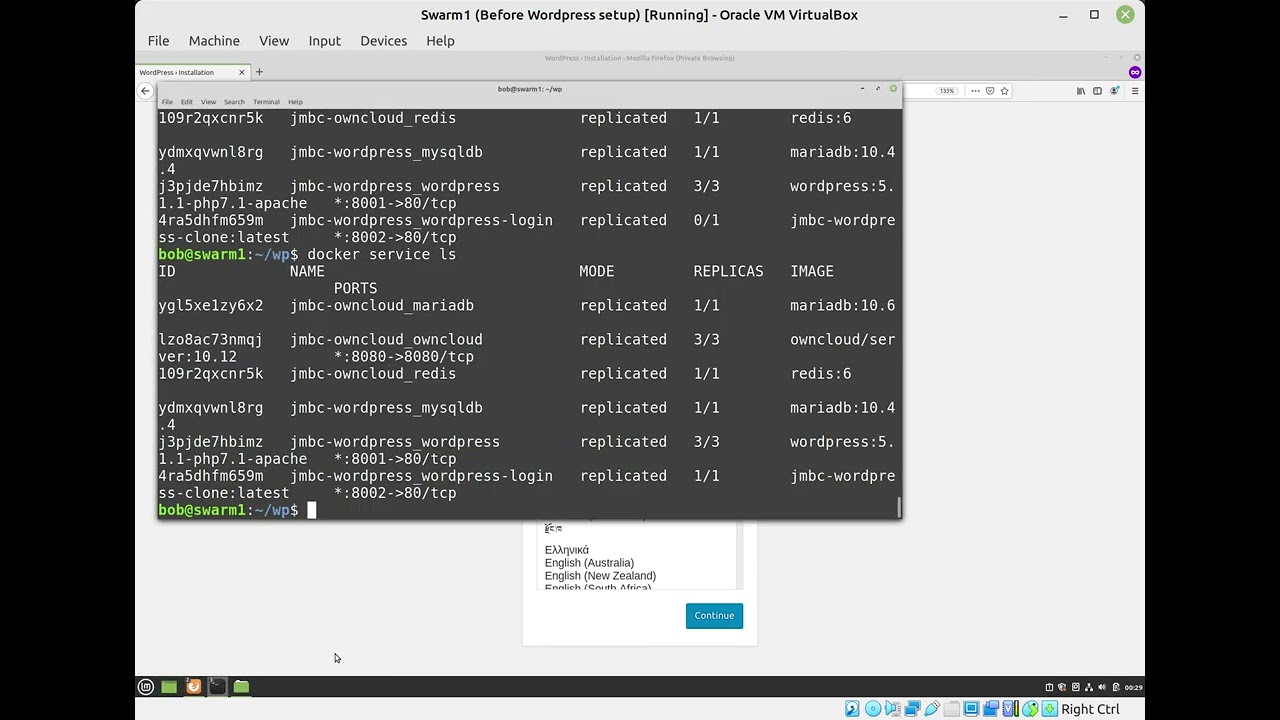
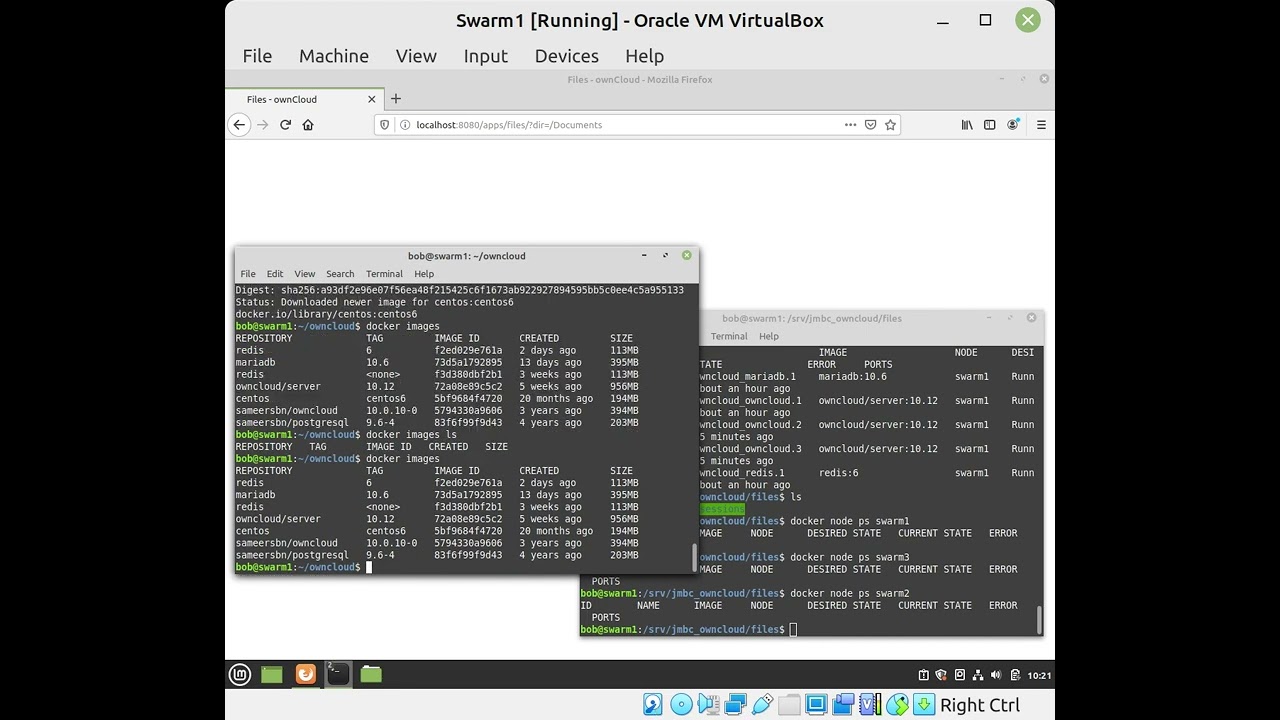
After the script finishes, the commands below will first show what manager/worker nodes there are. And then what services on running on the current manager node. You will add on the node name at end of command, to show the services running on that node.
docker node ls
docker node ps <node name>
You can see where the containers are distributed. The WordPress’s MySQL container IS NO LONGER STUCK on the swarm manager, after the permission change. The same permission change will likely work for OwnCloud’s MySQL, even though it is a different version, stored on a different folder.
But you should be able to access the WordPress website, via
http://localhost:8001
I recommend setting up WordPress on LOCALHOST! Remember that it is more forgiving, for “HOST” header not matching it’s HOME_URL, when set up on localhost. Don’t change the URL in the dashboard setup, though. That doesn’t work right, in the cluster configuration.
But after setup, any reader can visit from their web browser, and read the blogs and it will be load balanced between any of the 3 port 8001 containers.
http://<static ip address of any of the nodes>:8001
But if you need to login, and make content changes, this needs to be done on the port 8002 container. You have to use your browser to visit:
http://<static ip address of any of the nodes>:8002/wp-login.php
And login on the port 8002 URL, and add posts and content, and then see the changes reflect in the port 8001 URL, served by the load balanced replicas.
Congratulations, you have a load balanced implementation of WordPress! Have fun!
fickin CLI’s
Why is “docker images” produce a different output, from “docker images ls”?
Final Proxmox HA failover demonstration, not documented in this post.

(But interesting if you want to see how the single point of failure in the docker swarm cluster was overcome: the NFS mount backing storage)
We had a VM on Proxmox HA, which restarted on another node cluster upon detection of failure. The VM’s virtual HD was installed on CEPH distributed storage. This VM served NFS for containers, so the containers always had access to NFS data, which was inside a virtual HD, storage among a CEPH distributed storage.